List of intersections
| Navigation: | Main Page → Civilized Areas → List of intersections | |||

|
This page is actively under construction! Please ask the following users for permission before editing this page: Tempest In progress |
This page lists all of the intersections in the Mazes. All intersections are modeled on the same basic pattern and possess the same shops and facilities, with one of the few differences being which chains operate certain local shops (in particular, the convenience store, forge, gun shop, and weapon shop)
Contents
Sortable list
| Intersection | Zone | Geographic connections | Convenience store chain | Forge chain | Gun shop chain | Weapon shop chain |
|---|---|---|---|---|---|---|
| Intersection 01 | Northwestern | North: Roazon East: Fort Phantom South: Station Delta West: N/A |
... | ... | ... | ... |
| Intersection 02 | Northeastern | North: N/A East: Mippei Yosai South: Echizen West: Kazama |
... | ... | ... | ... |
| Intersection 03 | Northeastern | North: Kazama East: Kijirou South: Yurai West: Aosaidan |
... | ... | ... | ... |
| Intersection 04 | Northwestern | North: Fort Phantom East: Viris Area South: Alba Radium West: Station Delta |
... | ... | ... | ... |
| Intersection 05 | Northern | North: Viris Area East: Ovis City South: Nanton West: Camp Charger |
... | ... | ... | ... |
| Intersection 06 | Eastern | North: Kijirou East: Utroba South: Garica Block West: Masatomo |
... | ... | ... | ... |
| Intersection 07 | Eastern | North: Kijirou East: Utroba South: Garica Block West: Masatomo |
... | ... | ... | ... |
| Intersection 08 | Central | North: Ovis City East: Murberry South: Calfair Sector West: Nanton |
... | ... | ... | ... |
| Intersection 09 | Eastern | North: Wayward East: Arnett South: Semitas West: Intersection 11 |
... | ... | ... | ... |
| Intersection 10 | Central | North: Littleton East: Twinleaf City South: Intersection 13 West: Murberry |
... | ... | ... | ... |
| Intersection 11 | Eastern | North: Garica Block East: Intersection 09 South: Semitas West: Intersection 14 |
... | ... | ... | ... |
| Intersection 12 | Western | North: N/A East: Camp Charger South: Fort Cobalt West: Lenox Corner |
... | ... | ... | ... |
| Intersection 13 | Central | North: Intersection 10 East: Intersection 15 South: Heshbar West: Neo Khazrun |
... | ... | ... | ... |
| Intersection 14 | Eastern | North: Fort Silver East: Intersection 11 South: Joliet Sector West: Rog |
... | ... | ... | ... |
| Intersection 15 | Central | North: Twinleaf City East: Intersection 17 South: Citadel Lambeth West: Intersection 13 |
... | ... | ... | ... |
| Intersection 16 | Central | North: Neo Khazrun East: N/A South: Intersection 20 West: Ellen Sector |
... | ... | ... | ... |
| Intersection 17 | Eastern | North: Intersection 15 East: Rog South: Intersection 22 West: Citadel Lambeth |
... | ... | ... | ... |
| Intersection 18 | Eastern | North: Semitas East: N/A South: Novysera West: Joliet Sector |
... | ... | ... | ... |
| Intersection 19 | Western | North: Beatus East: Fort Cobalt South: Fort Scarlet West: Fort Wight |
... | ... | ... | ... |
| Intersection 20 | Southern | North: Intersection 16 East: Camp Baxter South: Ferland Sector West: Beadsor |
... | ... | ... | ... |
| Intersection 21 | Southern | North: Ventis East: Citadel Lambeth South: Intersection 24 West: Abakash |
... | ... | ... | ... |
| Intersection 22 | Southeastern | North: Intersection 17 East: Intersection 23 South: Temno West: N/A |
... | ... | ... | ... |
| Intersection 23 | Southeastern | North: Rog East: Sirvarris South: Elusec West: Intersection 22 |
... | ... | ... | ... |
| Intersection 24 | Southern | North: Intersection 21 East: Temno South: Flaxton West: N/A |
... | ... | ... | ... |
| Intersection 25 | Southeastern | North: Sirvarris East: Intersection 26 South: N/A West: Elusec |
... | ... | ... | ... |
| Intersection 26 | Southeastern | North: Novysera East: Greening South: Baden Town West: Intersection 25 |
... | ... | ... | ... |
| Intersection 27 | Southern | North: N/A East: Station Sigma South: Station Lasker West: Fort Scarlet |
... | ... | ... | ... |
| Intersection 28 | Southern | North: Gehen East: Camp Huntsman South: N/A West: Station Lasker |
... | ... | ... | ... |
| Intersection 29 | Southeastern | North: N/A East: Ferron City South: Camp Huntsman West: Flaxton |
... | ... | ... | ... |
Map
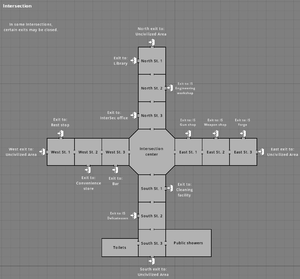
As explained above, all intersections share the same map.
Exits at the North, East, South, and West lead to the corresponding locations listed under Geographic connections in the table above.
Rooms
Intersection center
- Personnel: None
- Furniture: Wall benches and tables
- Cover:
- All sides: Sandbag nest (83 health, A4)
Streets
Used for all streets (North/East/South/West Street 1-3)
- Personnel: None
- Furniture: None
- Cover:
- All sides: None
Streets connect to shops and facilities in the intersection.
Toilets
- Personnel: None
- Furniture: Mirror, sink, 8 toilet cabins, 8 urinals
- Cover:
- All sides: None
Public showers
- Personnel: None
- Furniture: Mirror, sink, 12 shower cabins, wall of temporary-use lockers
- Cover:
- All sides: None
The temporary-use lockers are generally empty and possess no locking mechanism. Their purpose is to temporarily stash clothing and equipment while taking a shower, protecting them from water and humidity.
